
Getting started with your VPS
Your VPS is your own virtual server in our data center in the Netherlands. You get root access and a fixed IPv4 and IPv6 address, and you choose the operating system yourself. A VPS is unmanaged: you manage the software and the security, and we make sure the hardware, the network and the backups keep running.
1. Choose an operating system
After you place your order, you'll receive an email with a button that takes you to your VPS. You can also find it under My Products. There, choose:
- Operating system: Ubuntu 24.04 or 26.04 LTS, Debian 12 or 13, AlmaLinux 9 or 10, or Rocky Linux 9 or 10. Not sure? Go with Ubuntu 24.04 LTS, since most guides on the internet assume it.
- Root password: at least 12 characters, including a lowercase letter, an uppercase letter and a number. We don't store it.
- SSH key (optional, but recommended): paste your public key so you can log in without a password. See Logging in to your VPS with SSH (and creating an SSH key).
After about two minutes your VPS is up and running, and you'll receive an email with your IP address.
2. Log in
Open a terminal (on Windows: PowerShell) and type ssh root@jouw-ip-adres. The first time, your computer will ask whether you trust the server; type yes.
3. Update first
Update your system right away:
- Ubuntu and Debian:
apt update && apt upgrade -y - AlmaLinux and Rocky Linux:
dnf upgrade -y
Then read Securing your VPS: the first five minutes. It's five minutes of work that will save you a lot of trouble.
What can you do in the VPS screen?
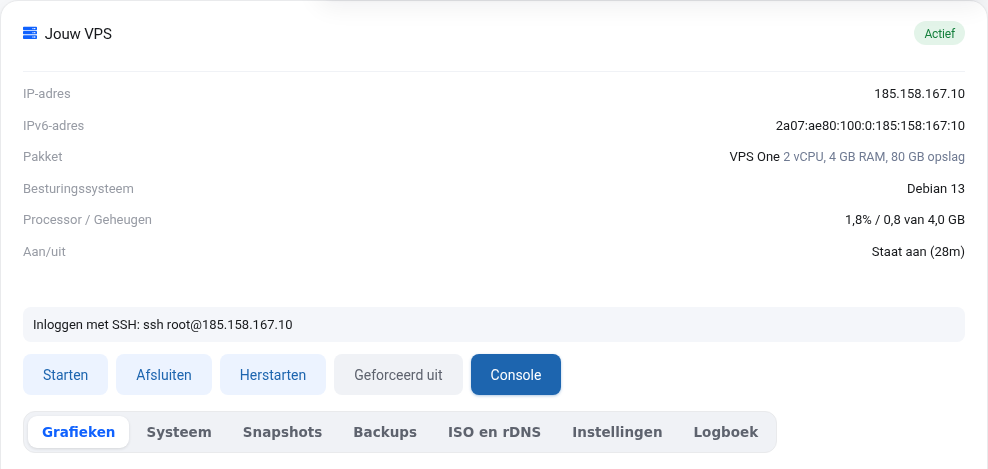
- Power on, power off and restart. "Force off" is like pulling the plug, so use Shut down instead whenever you can.
- Console: your VPS screen in your browser, even when SSH or the network isn't working.
- Graphs of processor, memory, network and disk usage, from hourly up to yearly.
- System: operating system, disk usage and IP addresses as seen from inside the server.
- Snapshots and backups, mount ISO, reverse DNS, new root password and reinstall.
Detailed explanation with screenshots: Installing your VPS: operating system, password and SSH key and The VPS screen in the VPS manual.
Want to learn more? Take the free course on VPS and Linux server management, lesson 1.1 What a VPS is and what you manage or lesson 1.2 Choosing and installing a VPS.